REQUIRE A BESPOKE LOOK?
We offer a custom design
service at NO extra cost.
Our sliding wardrobe door kits come ready assembled for simple DIY installation, however, in some instances you may need to disassemble and reassemble the sliding door kit yourself. For instance self assembly maybe required where access to the point at which you wish to install your sliding wardrobe doors is restricted (e.g. tight staircase, narrow corridor).
If you require a self assembly wardrobe door kit then we will still send you the doors fully assembled. You will then have the advantage to see how each component fits together, no guess work or hard to follow instructions required.
Use the information in this how to guide to carefully disassemble the doors into it's kit form taking note of the position and fixing of each component. Perform your DIY self assembly in the room where the sliding wardrobe doors are to be installed. We will also help you choose the type of DIY wardrobe door kit that is best suited to self assembly.
Please Note: Our sliding wardrobe door kits come ready assembled and the construction details below are intended as helpful information only. If you do decide to take your sliding wardrobe doors apart Wardrobe Doors Direct cannot be held responsible for any damage incurred or any subsequent malfunction of the doors.
This guide aims to help you understand the way in which our doors are constructed and it will also give you an insight into the differing construction methods between steel and aluminium framed doors. For additional information on this particular aspect please also see the following article: The differences between steel and aluminium framed wardrobe doors.
If it is likely that you will need to take the doors apart to get them to the place of installation we would recommend that you choose steel framed doors (as opposed to the aluminium framed doors) as these are much simpler in their construction. We would also recommend that you choose a split panel design as the smaller panel sizes will be easier to manoeuvre though restricted spaces.
The diagram below illustrates the various kit components that go into the construction of each steel framed sliding door. We will talk about individual parts in more detail later. If you would like more information on profile details and measurements please refer to our steel sliding wardrobe doors technical detail article.
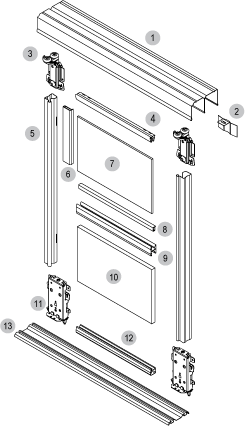
1. Double top track (steel)
2. Door positioner
3. Twin wheel top guide
4. Top rail (steel)
5. Stile (steel)
6. Stile spacer
7. 4mm glass panel
8. H-bar spacer
9. H-bar (steel)
10. 8mm Melamine Faced Chipboard (MFC) panel
11. Bottom running gear
12. Bottom rail (steel)
13. Bottom track (steel)
From the aperture measurements that are provided by you the individual door size, the number of door overlaps, the top and bottom tracks and the frame widths are calculated. For more information on how to measure the aperture opening for your doors please read the sliding wardrobe doors measuring guide.
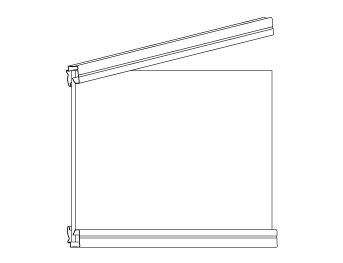
Once the panels have been cut to the correct size the stiles (vertical profiles) are installed. These are what you will hold to open and close the doors. Depending on the panel material, stile spacers may also be installed. Holes are drilled into the stiles to help with construction.
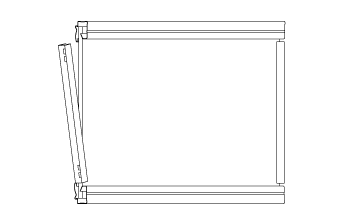
The top and bottom rails are then attached to the doors. Before installation, holes are drilled into the rails to help with construction.
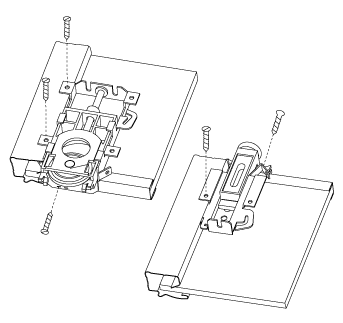
The running gear is positioned so the wheels fit into the pre-made holes in the rails and then pushed into position so the catch snaps into the hole in the stile. Self tapping screws are then used to secure the running gear in place.
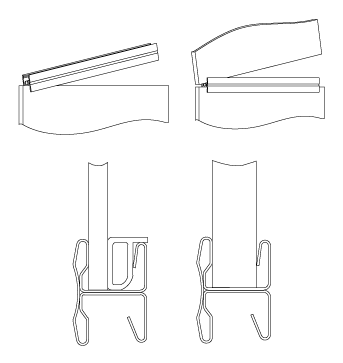
Depending upon the panel material used - mirrored/coloured glass or Melamine Faced Chipboard (MFC) - a spacer bar is fitted between the H-bars. When using an H-bar design with coloured or mirrored glass your doors will come H-bar spacers fitted.
The diagram below illustrates the various kit components that go into the construction of each aluminium framed sliding door. There are many more components used in the construction of these doors compared to the steel framed doors as the aluminium doors can carry panels on both sides so they can be used as sliding room dividers. If you would like more information on profile details and measurements please refer to our aluminium sliding wardrobe doors technical detail article - coming soon.
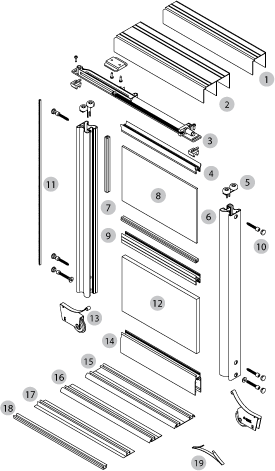
1. Single track top (aluminium)
2. Double top track (aluminium)
3. Soft closer (optional extra)
4. Top rail (aluminium)
5. Top guide (ball bearing)
6 Stile (aluminium)
7. Clear rubber gasket (glass and mirror doors only)
8. Glass panel
9. H-bar (aluminium)
10. Plastic cap
11. Brush strip (optional extra)
12. Wood panel
13. Bottom runner gear (ball bearing)
14. Bottom rail (aluminium)
15. Double bottom track (aluminium)
16. Recessed single bottom track mounting profile (aluminium)
17. Recessed wide single bottom track (aluminium)
18. Recessed single bottom track (aluminium)
19. Bottom door positioner
From the aperture measurements that are provided by you the individual door size, the number of door overlaps, the top and bottom tracks and the frame widths are calculated. The calculations for working out the size of the panels are slightly different to the ones used for the steel farmed doors but essentially the same process is followed.
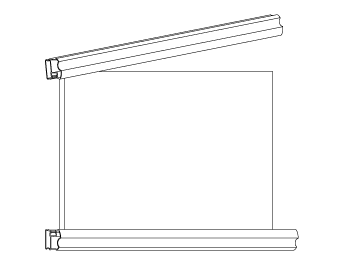
Once the panels have been cut to the correct size the stiles (vertical profiles) are installed. These are what you will hold to open and close the doors. Clear rubber gaskets are used to protect / hold the coloured glass / mirror in place.
Holes are drilled into the stiles to help with construction.
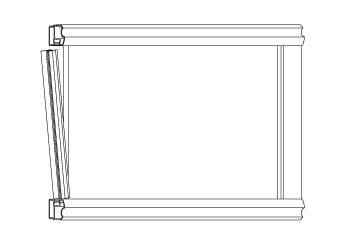
The top and bottom rails are then attached to the doors.
Before installation, holes are drilled into the rails to help with construction.
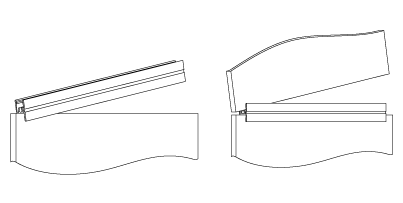
Depending upon the panel material used - mirrored/coloured glass or Melamine Faced Chipboard (MFC) - a clear rubber gasket is fitted between the H-bars. When using an H-bar design with coloured or mirrored glass your doors will come with a clear rubber gasket fitted.
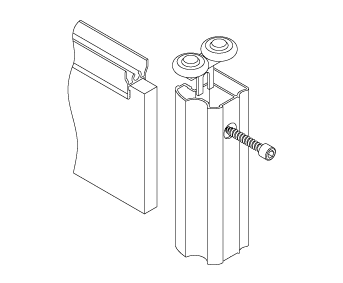
The self-tapping screw fasten the stile, top guide and top rail together.
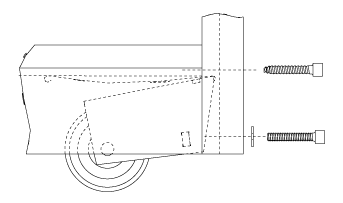
The top self-tapping screw fastens the bottom rail to the stile. The bottom screw is used to adjust the height of the wheel.
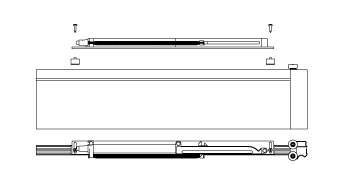
If you have specified them the soft-closers will come ready attached to the tops of the doors. However, you will need to attach the bush-pushers and detailed instructions that come with the doors will guide you how to do this.
It's a toss up between making sliding wardrobe doors and helping our customers as to what we do best. It's really important to us that we make your own sliding wardrobe doors purchase and installation as easy, smooth and pleasurable as possible. We hope that this and our other guides help make the service we provide better than other sliding wardrobe door manufacturers.
We are always happy to receive feedback and pictures of your DIY installed wardrobe doors (voucher for any we use on the website). You can call us for further assistance on Freephone 0800 035 1730.

We offer a custom design
service at NO extra cost.
Follow these simple guidelines to
get the perfect fit for your sliding
wardrobe doors.
The sliding wardrobe doors are
very easy to install so you don’t
have to be a DIY expert.
Request FREE samples to help
with the design process and
colour matching.